Desserts are the fairy tales of the kitchen.
Kintsugi 5/4/26
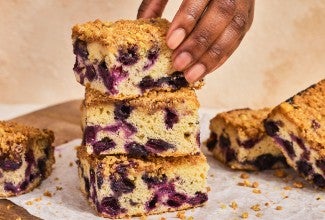
This summer breakfast cake is positively bursting with flavor! From the fresh blueberries and lemon zest in the cake to the nuts and cinnamon sugar in the copious amounts of buttery topping, we’re both thrilled and thankful that Chef Adrian Lipscombe shared this recipe with us. She notes, “Historically, this cake was served during Juneteenth celebration in Texas … It was made with seasonal berries in June, which is blueberry season in Texas. This is one of many cakes that represent freedom, justice, and celebration.” This is from King Arthur Baking Company.
Ingredients
Streusel
- 1/3 cup (66g) granulated sugar
- 1/3 cup (71g) light brown sugar, packed
- 1/16 teaspoon (pinch) table salt
- 1/2 cup (60g) King Arthur Unbleached All-Purpose Flour
- 1 teaspoon ground cinnamon
- 1/2 teaspoon ground ginger
- 6 tablespoons (85g) butter, cold
- 1/2 cup (57g) pecans or walnuts, finely chopped (toasted if you feel like it)
Cake
- 2 cups (240g) King Arthur Unbleached All-Purpose Flour
- 1/2 cup (99g) granulated sugar
- 1/2 teaspoon table salt
- 2 teaspoons baking powder
- 4 tablespoons (57g) butter, softened
- 1 large egg
- 1/2 cup (113g) milk
- 1/2 teaspoon almond extract
- 1 teaspoon King Arthur Pure Vanilla Extract
- 1 teaspoon lemon zest
- 2 cups (340g) blueberries (fresh or frozen; small wild berries taste best)
Instructions
-
Preheat the oven to 350°F. Lightly grease (or line with parchment) a 9″ square pan.
-
To make the streusel: In a medium bowl, stir together the sugars, salt, flour, and spices.
-
Work in the cold butter until the mixture is evenly crumbly, then stir in the chopped nuts. Set aside.
-
To make the cake: In a large bowl or the bowl of a stand mixer, combine the flour, sugar, salt, and baking powder.
-
Cut the butter into small pieces and add it to the bowl of dry ingredients. Beat at low speed until the mixture is sandy looking.
-
In a separate bowl, whisk together the egg, milk, extracts, and lemon zest. Add the liquid ingredients to the dry ingredients and mix until combined. Note: the batter will be very thick.
-
Using a spatula, carefully fold the blueberries into the batter.
-
Spoon the batter into the prepared pan, gently spreading it evenly across the bottom.
-
Sprinkle the streusel topping over the batter, shaking the pan to distribute it evenly.
-
Bake the cake for 45 to 50 minutes, until it’s brown on top and a toothpick inserted into the center comes out clean.
-
Remove the cake from the oven and let it cool to room temperature in the pan before serving.
-
Storage information: Store any leftover cake at room temperature, covered, for up to a week. Freeze for longer storage.
Banana Snacking Cake
Ingredients
For the Cake
- 2 cups all-purpose flour
- 1 ½ teaspoons fresh baking powder
- 1 teaspoon baking soda
- 1/2 teaspoon salt
- ¾ cup sugar
- ½ cup butter, melted (1 stick)
- ½ cup buttermilk or yogurt
- 2 large or extra-large eggs
- 1 teaspoon pure vanilla extract or vanilla paste
- 2 very ripe bananas, mashed (about 1 cup)
- 1 cup toasted, chopped pecans or walnuts (optional)
For the Topping
- ¼ cup all-purpose flour
- ¼ cup dark brown sugar
- ¼ cup butter (½ stick)
Directions
- Preheat oven to 300°F. Prepare your pan with baking spray or line it with parchment paper with about 1.5 inches overlapping the sides of the pan, so you have enough paper to lift the cake out.
- In a large bowl, combine the flour, baking powder, baking soda, salt, and sugar. Add nuts if using.
- Blend in the melted butter, mixing until just barely combined.
- Add 1/4 cup of the buttermilk or yogurt and completely combine.
- In a separate bowl, combine the remaining buttermilk or yogurt with the eggs, then blend it into the flour mixture.
- Add the vanilla and mashed bananas. Beat for 1 minute. Place the batter in a prepared 9-by-13-by-2-inch pan.
- To make the topping, squeeze the flour, brown sugar, and butter together with your hands. Crumble the topping evenly over the batter.
- Bake for 35 to 40 minutes. Cool completely before serving.
Go here for the original recipe and a video.
Shaker Lemon Pie
Ingredients
● 2 pie crusts, rolled out to fit a 9inch pie pan and refrigerated
● 3 Meyer lemons, cut into very, very thin rounds (using a slicer or mandolin is advised, so if you don’t have one, buy one)
● 2 cups sugar
● 1/2 teaspoon salt
● 2 large eggs
● 2 large egg yolks
● 3 tablespoons all-purpose flour
● Egg wash (made from 1 large egg beaten with a pinch of salt)
● Sanding sugar (raw sugar, Demarra sugar, etc.)
Directions
- Toss lemon slices with 2 cups of sugar until slices are all evenly coated, and macerate (allow them to sit so the sugar can draw the liquid out) for 2 hours at room temperature.
- Preheat oven to 425°F (220°C). Beat eggs and yolks together with salt. Add flour a little at a time, whisking continuously to avoid flour lumps. Add egg mixture to the lemons and mix well with a big rubber spatula. Pour mixture into chilled bottom crust. Cover with chilled top crust and trim edges, then shape edges as desired, creating a seal. Cut slits in the top to vent pie, then place in the fridge for 20 minutes.
- Right before baking, brush top of pie with egg wash and sprinkle with sanding sugar. Bake at 425°F (220°C) for 20 minutes on the bottom rack, turning halfway through. Turn the oven down to 350°F (180°C) and bake until filling puffs crust up a bit, about 15 to 20 minutes.
- Remove from oven and allow to cool completely, then chill for at least 1 hour before serving.
Martha Stewart’s Peach and Blueberry Tart with Cream Cheese Filling
Ingredients
1 stick plus 3 tablespoons unsalted butter, room temperature
⅓ cup confectioners’ sugar
1 ⅔ cups unbleached all-purpose flour
¾ teaspoon kosher salt
6 ounces cream cheese, room temperature
1 teaspoon grated lemon zest, plus 2 tablespoons fresh juice
½ cup granulated sugar
⅔ cup heavy cream
3 ripe peaches (1 pound)
1 cup fresh blueberries
Mint leaves, for serving
Directions
Step 1: Preheat oven to 375°F. Beat butter with confectioners’ sugar on medium speed until pale and fluffy, about 3 minutes. Reduce speed to medium-low; add flour and 1/2 teaspoon salt and beat until just combined and crumbly (do not overmix). Press evenly into the bottom and up sides of a 9-inch square tart pan with a removable bottom. Prick bottom at 1-inch intervals with the tines of a fork. Freeze 15 minutes.
Step 2: Bake until golden brown and set, 30 to 33 minutes. Let cool completely. (Crust can be kept at room temperature, wrapped in plastic, for up to 3 days.)
Step 3: Beat together cream cheese, lemon zest, 1 tablespoon juice, and 1/4 cup granulated sugar on medium-high speed until creamy. With mixer running, slowly add cream and beat until light and fluffy, 1 to 2 minutes. (You should have about 2 cups.) Spread mixture into crust; refrigerate 1 to 2 hours.
Step 4: Meanwhile, using a vegetable peeler, peel peaches, if desired; cut into 1/2-inch-thick wedges. Transfer to a bowl and stir in berries, the remaining 1/4 cup granulated sugar, 1 tablespoon lemon juice, and 1/4 teaspoon salt.
Step 5: Just before serving, spoon macerated fruit over the tart and drizzle some of the juice from the bowl over it. Sprinkle with mint and serve, with any remaining fruit on the side.
Sometimes you need something chocolate. What about Chocolate Cake for One from Joanie Zisk’s One Dish Kitchen blog? This is a great resource if you live alone or with one other person. The recipes are sized down for one or two. She also has a leftover ingredients recipe finder so you can use up leftover egg white or half a can of tomato paste.
Chocolate Cake for One
Equipment
Ingredients
-
- 3 tablespoons salted butter -melted
- ¼ cup granulated sugar
- 1 large egg white
- 1 ½ teaspoons vanilla extract
- 4 tablespoons all-purpose flour
- 1 ½ tablespoons unsweetened cocoa powder
- ¼ teaspoon baking powder
- ⅛ teaspoon baking soda
- 3 tablespoons heavy cream
- powdered sugar -for topping. Or top this cake with buttercream frosting, chocolate frosting, cream cheese frosting, chocolate ganache, or homemade whipped cream for a richer finish.
Instructions
-
Preheat the Oven: Set the oven to 350°F (175°C). Lightly butter a 10-ounce ramekin and set it aside.
-
Mix Wet Ingredients: In a medium bowl, whisk together the melted butter, sugar, egg white, and vanilla until smooth.
-
Combine Dry Ingredients: In a small bowl, whisk the flour, cocoa powder, baking powder, and baking soda.
-
Mix Batter: Gradually stir the dry ingredients into the wet mixture. Then, stir in the heavy cream until fully combined.
-
Fill the Ramekin: Pour the batter into the prepared ramekin.
-
Bake the Cake: Bake for 20-25 minutes, or until a toothpick inserted in the center comes out clean. Let the cake cool on a rack.
-
Serve: Enjoy the cake directly from the ramekin, or loosen the edges with a knife. Place a plate on top, flip the ramekin, and slide the cake out. Top with frosting or dust with powdered sugar.
Notes
- Measure Accurately: Proper measurements are key to great results.
- Avoid Overmixing: Mix just until combined to keep the cake soft and tender.
- Grease the Ramekin: Ensures the cake doesn’t stick and makes removal easier.
- Test for Doneness: Insert a toothpick into the center; it’s done if it comes out clean.
- Cool Before Topping: Let the cake cool slightly before dusting with powdered sugar to avoid melting.
- Enjoy Fresh: This cake is best eaten the day it’s made.
We all need an easy, delicious recipe. I used peaches, and it was easy and delicious.
Baby Lemon Impossible Pie Recipe
Ingredients
- 2 tablespoons butter, melted
- 1 can (14 ounces) sweetened condensed milk
- 1 cup whole milk
- ½ cup all-purpose flour
- 3 large eggs
- 1 teaspoon vanilla extract
- 1 pinch salt
- Zest of 1 lemon
- Juice of 1 to 2 lemons
Process
- Preheat your oven to 350°F (175°C). Grease a 12-cup muffin tin with butter or nonstick spray so the pies release easily after baking.
- Separate the egg yolks from the whites. In a large bowl beat the yolks with softened butter, sweetened condensed milk, whole milk, lemon zest, and vanilla until smooth. Stir in the flour and a pinch of salt until combined. In another bowl whip the egg whites until soft peaks form. Fold one third of the whites into the batter to lighten it, then gently fold in the rest. Stir in the fresh lemon juice at the end. The batter will be thin.
- Divide the batter evenly among the muffin cups, filling each about three quarters full. Tap the pan gently on the counter to remove air bubbles.
- Bake for 22 to 25 minutes. The pies are ready when the edges are set and golden and the centers still jiggle slightly. A toothpick inserted into the center should come out mostly clean. Do not overbake or the custard will lose its creamy texture.
- Let the pies cool in the pan, then remove them carefully. Serve them plain or dust lightly with powdered sugar before enjoying.
Very Easy Peach Apple Pear Cobbler
This is my recipe for using the last of the seasonal apples and pears.
Take 2 jars of peaches (I get mine from Costco, 24 oz in a jar) and drain them, reserving the liquid
Peel 5 or 6 apples, then core and slice them. If they are organic, you don’t have to peel them, but you should.
Peel 5 or 6 pears, Bartlett, Bosc, or whatever you have, then core and slice them. You don’t have to peel them, but it is better if you do.
Mix them in a bowl. Add about 1/2 cup brown sugar, more if you have a raging sweet tooth like me. More means up to a cup.
Add the same amount of cornstarch or tapioca flour, or all-purpose flour – 1/2 cup or so.
If you like your pie juicy, add a little of the peach liquid (not too much, this is pie, not fruit soup) and increase the cornstarch by a heaping tablespoon.
Sprinkle with a healthy amount of cinnamon and half as much nutmeg. Mix so the powders are all over the fruit. I also add a bit of vanilla paste, or a scant teaspoon of vanilla extract.
Dice one stick of butter. Scatter it over the fruit. Get out a 9×13 pan. Preheat your oven to 350F. Put something on the bottom shelf to catch the drips, like a cookie sheet.
Spray your cooking pan with plain cooking spray, or take a paper towel and wipe the sides and bottom with butter or shortening. You want this to be easy to scoop out.
Pour the fruit mixture into the prepared pan.
Here is the tricky part. I use prepared crusts from the dairy case when I’m feeling lazy. Take 1 crust for a 9-inch pie pan, sprinkle some flour on the counter, and unroll the crust.
If you have a rolling pin, flour it and roll the crust so it is more rectangular than round. Don’t do too much work or the crust will be tough.
Slice the crust into 1-inch strips. They will not be even, and may look kind of hinky, but that’s OK. They will bake up just fine.
Make a lattice top using the strips. If you don’t have enough strips, use the other crust from the box. Cover the pie with the lattice top and bake the pie at 350 for about 50 minutes or so. Look at it and see if the filling is bubbling up. If it is browning too fast, cover the pie lightly with a sheet of foil and keep baking. You want to bake it long enough for the apples to be done, but not so long they turn into applesauce. Mine usually takes about 45-50 minutes.
I eat my pie with vanilla ice cream, or whipped cream (none of this whipped topping stuff), or pouring cream i.e custard sauce. Yum, yum, and yum. BTW, you can make this in a smaller amount, if there are only 2 of you, or you know you’ll eat as much of it as you have in the house – I’m looking in the mirror here –
Vanilla Wacky Cake
Ingredients
Cake
- Baking spray with flour
- 1 3/4 cup (about 7 1/2 oz.) all-purpose flour
- 1 cup granulated sugar
- 1 tsp. baking soda
- 1/4 tsp. kosher salt
- 1 cup tap water
- 1/3 cup neutral oil (such as vegetable or canola)
- 1 Tbsp. white distilled vinegar
- 2 tsp. vanilla extract
Vanilla Buttercream
- 3/4 cup (6 oz.) unsalted butter, at room temperature
- 1 1/2 tsp. vanilla extract
- 2 cups (8 oz.) powdered sugar
- 1 Tbsp. heavy whipping cream
- 1/4 tsp. kosher salt
- White candy sprinkles (optional)
Instructions
- Preheat oven to 350°F, and coat an 8-inch square baking pan with baking spray.
- Whisk together flour, sugar, baking soda, and salt in prepared pan until combined.
- Combine water, oil, vinegar, and vanilla in a liquid measuring cup, then pour over flour mixture in pan. Stir mixture
until just a few dry streaks remain, and immediately transfer to preheated oven. - Bake until a wooden pick inserted into center comes out clean with a few moist crumbs, 20 to 25 minutes. Let cool
completely in pan on a wire rack, 2 hours. - Prepare the Vanilla Buttercream: Beat butter and vanilla in a stand mixer fitted with a whisk attachment on
medium speed until light and fluffy, about 2 minutes, stopping to scrape down sides of bowl as needed. - Beat in powdered sugar, 1/2 cup at a time, then beat in cream and salt until smooth, about 1 minute.
Spread Buttercream evenly over the cooled cake, and garnish with sprinkles, if using.
White Velvet Cake
from BH&G
This is the best white cake I’ve ever eaten. I use 8-inch pans and split the layers in half, so I have a 4-layer cake. It must be refrigerated if not finished the first day. It will hold about 2-3 days, but the quality is best the first 2 days. Read through the recipe completely, and prepare your ingredients before starting. Make the frosting first, then make the cake while the frosting is chilling.
White Velvet Cake
- 3 cups all-purpose flour
- 1/4 cup cornstarch
- 2 tsp. baking soda
- 1 tsp. salt
- 3/4 cup butter, softened
- 2 1/4 cups sugar
- 5 egg whites (use the yolks for egg custard or something delicious)
- 1/2 cup vegetable oil (not olive oil, but some bland oil)
- 2 tsp. vanilla extract or paste (paste tastes better, but extract doesn’t darken the cake)
- 1 tsp. almond extract
- 1 1/4 cups buttermilk
Ermine Frosting
- 1 1/2 cups sugar
- 1/3 cup all-purpose flour
- Dash salt
- 1 1/2 cups milk
- 2 tsp. vanilla extract
- 2 cups butter, softened
Directions
White Velvet Cake
-
Preheat oven to 350°F. Grease two 9×2-inch round cake pans. Line pan bottoms with parchment paper. Lightly flour pans. (I spray the pans with cooking spray, line them with parchment paper, then spray that with baking spray.) In a medium bowl, stir together the 3 cups of flour, cornstarch, baking soda, and salt.
-
In an extra-large bowl, beat butter with a mixer on medium 30 seconds. Gradually add sugar, 1/4 cup at a time, beating on medium until combined. Scrape bowl; beat 2 minutes more. Add egg whites, vegetable oil, vanilla, and almond extract. Beat until combined. Add flour mixture and buttermilk alternately, beating on low after each addition just until combined. Spread batter into prepared pans.
-
Bake 35 – 40 minutes or until a toothpick inserted in the center comes out clean. Cool in pans on wire racks 10 minutes. Remove layers from pans; cool completely on wire racks.
-
Place one cake layer, bottom side up, on a plate. Spread with 1 1/2 cups frosting. Top with second layer, bottom side cup; spread top and sides of cake with remaining frosting.
Ermine Frosting
-
In a medium saucepan, whisk together sugar, 1/3 cup of the flour, and salt. Whisk in milk. Cook and stir over medium heat until thickened and bubbly. Remove from heat; stir in vanilla. Transfer to a large bowl. Cover surface with plastic wrap and cool to less than 80°F, about 2 to 2 1/2 hours. Meanwhile, prepare cake layers.
-
When the flour mixture has cooled, cut the 2 cups of butter in 1 Tbsp. pieces. Beat in butter, one piece at a time, with a mixer on medium-high until smooth, scraping bowl as needed. Make sure each piece of butter is incorporated before adding the next. Frosting may look curdled until all the butter is added.
Special note: If frosting looks curdled after all your butter is added, the mixture may be too cold. To warm, remove the bowl from your mixture and set the bowl over a pan of simmering water to gently warm the mixture for 1 to 2 minutes, stirring with a whisk during this time. (Note: You don’t want the bowl to come in contact with the water.) Return the bowl to the mixer and continue beating until the frosting becomes smoother while beating. If the frosting is thin, the mixture may be too warm. Chill mixture for 15 minutes in the refrigerator and continue beating. Repeat this as necessary.
Tunnel of Fudge Cake (my version)
This is like a huge lava cake, sort of, but with nuts.
Cake
- 1 3/4 cups white granulated sugar
- 1 3/4 cups butter, softened
- 6 large eggs
- 2 cups powdered sugar
- 2 1/4 cups all-purpose flour
- 3/4 cup unsweetened cocoa (natural or Dutch processed)
- 2 cups chopped toasted pecans (or walnuts if you are from the North)
Glaze
- 3/4 cup Confectioner’s sugar
- 1/4 cup unsweetened cocoa
- 4 to 6 teaspoons milk
Instructions
Heat oven to 350°F. Spray a 12-cup fluted tube cake pan or 10-inch tube pan with baker’s cooking spray (flour and oil type). In a stand mixer or large bowl, combine sugar and butter and beat until light and fluffy. Add eggs 1 at a time, beating well after each addition. Gradually add 2 cups of powdered sugar and blend well. Stir in flour, cocoa, and nuts until well blended. Spoon batter into prepared pan and spread evenly.
NOTE: This is a 1966 recipe, revised and modernized. The original recipe used boxed frosting mix. My first exposure to it was from The Helen Corbitt Collection cookbook by (of course) Helen Corbitt. When the recipe was first developed, the cocoa commonly found in American kitchens was natural cocoa, which is a lighter color than Dutch-processed cocoa. For more information about types of cocoa, go HERE.
Apple Slab Pie
Ingredients for Pie
- 4 refrigerator pie crusts at room temperature
- 9 cups peeled and thinly sliced apples (I like a mixture of these: Honeycrisp, Courtland, Braeburn, and Granny Smith)
- 2 cups granulated sugar
- 2 tablespoons tapioca flour or cornstarch
- 1 tablespoon lemon juice
- 2 teaspoons ground cinnamon
- 1 teaspoon ground nutmeg
- 1 teaspoon vanilla paste or vanilla extract
- tiny pinch salt
Ingredients for Glaze
- 6 tablespoons whole milk
- 1 tablespoon unsalted butter
- 1 ¼ cups powdered sugar
Instructions
- Preheat the oven to 400°F.
- Place two of the pie crusts on top of each other on a lightly floured work surface. Using a rolling pin, roll it out to a rough rectangle that is 18—12 inches.
- Prepare a 10x15x1-inch jelly roll pan by either buttering and flouring the pan, spraying with baking spray (Baker’s Joy), or lining with parchment paper with the excess paper hanging over the pan a couple of inches on both short ends.
- Place the crust in the prepared pan, forming it in the pan with the excess crust overlapping the sides. Set aside.
- In a large bowl, add the apples, sugar, tapioca flour or cornstarch, lemon juice, cinnamon, nutmeg, vanilla or vanilla paste, and a pinch of salt. Stir together until fully combined.
- Spread the apples evenly onto the crust.
- Again, roll out the last two pie crusts into an 18″ rectangle. Place them on top of the pan.
- Tuck the top crust under the bottom and crimp the edges. Cut slits in the top crust so air can escape.
- Bake for 30-35 minutes, tenting with foil after the first 15 minutes. Bake until golden brown. If you think it needs more browning after 35 minutes, take the foil off and watch closely until your desired color is reached.
- Place on a wire rack to cool for 1 hour.
- While the pie is cooling, place milk in a small saucepan and heat until warm but not bubbling. Add butter. Let it cool to room temperature and then add powdered sugar.
- After the pie has cooled, brush it all over with the glaze with a pastry brush. Wait 30 minutes, brush another layer of glaze on. Let cool for 30 more minutes, slice, and serve.
Apple Fritters
I use 3-4 good cooking apples of different kinds, i.e. Granny Smith, Gala, Honey Crisp, and Cameo. I also use either apple cider or apple juice that I’ve cooked down by half instead of sparkling apple cider. I like a combination of cinnamon and nutmeg. Twice as much cinnamon as nutmeg is about right. I always keep vanilla paste on hand in case I don’t have a vanilla bean. Substitute 1 teaspoon of vanilla paste for the vanilla bean.
Ingredients:
- 2 cups all-purpose flour
- 1/2 cup granulated sugar
- 2 teaspoons fresh baking powder
- 1/2 teaspoon salt
- 2 teaspoons ground cinnamon
- 1 teaspoon grated nutmeg
- 1 teaspoon vanilla paste
- 2 large eggs, beaten
- 1/2 cup milk
- 1/4 cup unsalted butter, melted and cooled
- 3-4 large apples, peeled and chopped
- for the glaze: 1 cup confectioner’s sugar, 2-3 Tablespoons milk, half and half or cream, 1 teaspoon vanilla
Instructions:
- In a large bowl, whisk together the flour, sugar, baking powder, salt, nutmeg, and cinnamon.
- In a separate bowl, whisk together the eggs, milk, vanilla, and melted butter.
- Add the wet ingredients to the dry ingredients and stir until just combined.
- Cook the apples in the butter for about 3-5 minutes until they are partially cooked. They should be soft but now browned. Let cool and fold in the apples.
- Heat about 2 inches of oil in a large pot or Dutch oven over medium-high heat until it reaches 350°F.
- Using a cookie scoop or spoon, drop the batter into the hot oil in small batches.
- Fry until golden brown on both sides, about 3 minutes per side.
- Remove with a slotted spoon and drain on paper towels.
- Make the glaze and drizzle the glaze over the fritters, or dunk the fritters in the glaze and let drip over a rack sitting on waxed paper.